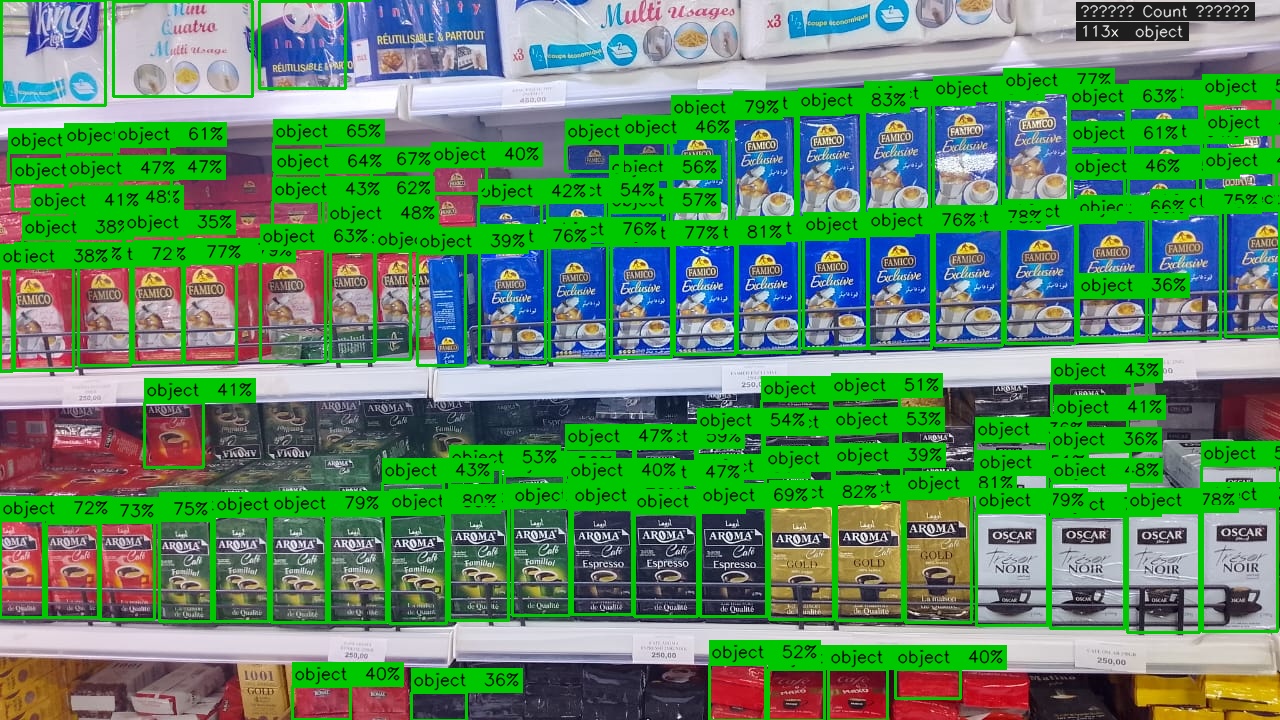
# Product Detection & Classification Pipeline

Scene
|

Product Detection - YOLOv8n
|

Product Classification - EfficientNet B0
|
A two-stage computer vision pipeline that combines a fine-tuned **YOLOv8n** detector with a **EfficientNet** classifier to detect and identify products on retail shelves.
```
Shelf image → YOLOv8n (detect) → EfficientNet (classify) → labelled bounding boxes
```
---
## Table of Contents
1. [Project Structure](#1-project-structure)
2. [Installation](#2-installation)
3. [Pipeline Overview](#3-pipeline-overview)
4. [Step-by-step Guide](#4-step-by-step-guide)
- [Step 1 — Generate crops](#step-1--generate-crops)
- [Step 2 — Auto-label & Review](#step-2--auto-label--review)
- [Step 3 — Split the dataset](#step-3--split-the-dataset)
- [Step 4 — Train the classifier](#step-4--train-the-classifier)
- [Step 5 — Run inference](#step-5--run-inference)
5. [API Server](#5-api-server)
6. [Script Reference](#6-script-reference)
7. [Troubleshooting](#7-troubleshooting)
8. [Tips & Best Practices](#8-tips--best-practices)
---
## 1. Project Structure
```
project/
│
├── detector/
│ └── best.pt ← your fine-tuned YOLOv8n weights
│
├── runs/classify/
│ ├── best.pt ← trained classifier weights (output of step 4)
│ ├── last.pt
│ ├── class_names.json ← {index: class_name} mapping
│ ├── training_curves.png
│ ├── per_class_accuracy.png
│ └── confusion_matrix.png
│
├── data/ ← labelled crops (built incrementally)
│ ├── cola_can/
│ ├── pepsi_can/
│ ├── _rejected_/ ← crops you rejected during review
│ └── _unreviewed_/ ← crops you skipped during review
│
├── crops_dataset/ ← final train/val/test split (input to training)
│ ├── train/
│ ├── val/
│ └── test/
│
├── 1_generate_crop_dataset.py ← detect & crop (no classifier needed)
├── auto_label.py ← detect + auto-classify + browser review UI
├── 1b_split_dataset.py ← stratified train/val/test splitter
├── 2_train_classifier.py ← train EfficientNet classifier
├── 3_inference.py ← end-to-end detect + classify on new images
├── api_server.py ← FastAPI polling server
├── balance_and_augment.py ← balance classes + generate augmented images
├── kaggle_train.py ← automate Kaggle upload + training + download
└── train_classifier_kaggle.ipynb
```
---
## 2. Installation
The project uses a **Conda environment** for reproducible dependency management.
### Create the environment
```bash
conda env create -f environment.yml
conda activate product-detection
```
### `environment.yml`
```yaml
name: product-detection
channels:
- conda-forge
dependencies:
- python=3.10
- numpy<2
- pip
- pip:
- torch
- torchvision
- opencv-python
- ultralytics
- pillow==10.0.0
- tqdm
- pyyaml
- simsimd
- albumentations
- faiss-cpu
- fastapi
- uvicorn[standard]
- flask
```
### GPU users
`torch` and `torchvision` are installed as CPU builds by default via pip inside conda. To use a GPU, replace the `torch` and `torchvision` lines in the yml with the CUDA-enabled builds before creating the environment:
```yaml
- torch==2.3.0+cu121
- torchvision==0.18.0+cu121
--extra-index-url https://download.pytorch.org/whl/cu121
```
Or install them manually after environment creation:
```bash
conda activate product-detection
pip install torch torchvision --index-url https://download.pytorch.org/whl/cu121
```
### Update an existing environment
If `environment.yml` changes, sync the existing environment without recreating it:
```bash
conda env update -f environment.yml --prune
```
---
## 3. Pipeline Overview
There are two ways to build your dataset depending on whether you already have a trained classifier:
```
┌─────────────────────────────────────────────────────────────────┐
│ PATH A — First time (no classifier yet) │
│ │
│ 1_generate_crop_dataset.py → label manually → │
│ 1b_split_dataset.py → 2_train_classifier.py │
└─────────────────────────────────────────────────────────────────┘
┌─────────────────────────────────────────────────────────────────┐
│ PATH B — You already have a classifier (recommended after v1) │
│ │
│ auto_label.py → review in browser → │
│ 1b_split_dataset.py → 2_train_classifier.py │
└─────────────────────────────────────────────────────────────────┘
```
Once you have a working classifier, always use **Path B**. It is faster, more accurate, and requires far less manual labelling work.
---
## 4. Step-by-step Guide
### Step 1 — Generate crops
> Use this step if you are starting from scratch with **no classifier yet**.
> If you already have `runs/classify/best.pt`, skip to Step 2.
Runs YOLOv8n on your shelf images and saves every detection as a cropped JPEG into `data/unknown/`. No classification happens here — you label manually afterwards.
```bash
python 1_generate_crop_dataset.py \
--source shelf_images/ \
--weights detector/best.pt \
--output_dir data \
--conf 0.25 \
--padding 10 \
--min_size 32
```
| Argument | Default | Description |
|---|---|---|
| `--source` | required | Image file, folder, or glob pattern |
| `--weights` | required | YOLOv8n `.pt` file |
| `--output_dir` | `data` | Root folder — crops go into `/unknown/` |
| `--conf` | `0.25` | Detection confidence threshold |
| `--iou` | `0.45` | NMS IoU threshold |
| `--padding` | `10` | Extra pixels added around each crop |
| `--min_size` | `32` | Discard crops smaller than this (px) |
| `--save_labels` | off | Save a `.txt` sidecar with YOLO class info |
**After this step**, move crops from `data/unknown/` into named class folders:
```
data/
unknown/ ← before
cola_can/ ← after (you create these)
pepsi_can/
lays_chips/
```
Use any file manager, or a tool like [Label Studio](https://labelstud.io/) for faster annotation.
**Class Labeller**
---
### Step 2 — Auto-label & Review
> Use this step once you have a trained classifier. It replaces manual labelling almost entirely.
Runs the full detect → crop → classify pipeline in one command, then opens a browser UI where you review, confirm, fix, or reject each prediction.
```bash
python auto_label.py \
--source shelf_images/ \
--detector_weights detector/best.pt \
--classifier_weights runs/classify/best.pt \
--output_dir data \
--cls_conf 0.50
```
| Argument | Default | Description |
|---|---|---|
| `--source` | required | Image file, folder, or glob |
| `--detector_weights` | required | YOLOv8n `.pt` |
| `--classifier_weights` | required | Classifier `best.pt` |
| `--output_dir` | `data` | Where confirmed crops are written |
| `--det_conf` | `0.25` | Detection threshold |
| `--cls_conf` | `0.50` | Min classifier confidence to auto-label |
| `--port` | `5000` | Browser UI port |
The browser opens automatically at `http://localhost:5000`.
#### Review UI controls
| Action | How |
|---|---|
| Open crop detail | Click a card |
| Confirm prediction | `C` key or **Confirm** button |
| Reject crop | `R` key or **Reject** button |
| Override the class | Pick from dropdown → **Apply override** |
| Navigate crops | `←` `→` arrow keys |
| Close modal | `Esc` |
| Multi-select | `Ctrl+click` or `Shift+click` |
| Bulk confirm/reject/reclassify | Select multiple → use bulk bar |
| Confirm all visible | **✓ Confirm all visible** button |
| Filter by class | Click a class in the left sidebar |
| Filter by status | Toggle buttons in toolbar |
| Filter by confidence | Drag the min-conf slider |
#### Status meanings
| Status | Meaning |
|---|---|
| `auto` | Classifier's prediction, not yet reviewed |
| `confirmed` | You agreed with the prediction |
| `reclassified` | You changed it to a different class |
| `rejected` | Not a useful crop (bad detection, not a product of interest) |
#### Committing
Click **Commit dataset →** to write all crops to `data/`:
```
data/
cola_can/ ← confirmed + reclassified
pepsi_can/
_rejected_/ ← rejected crops (kept for reference)
_unreviewed_/ ← anything still "auto" when you committed
```
> **Important:** Commit is always additive. It never deletes existing files in `data/`.
> Running `auto_label.py` on new shelf images simply grows the dataset.
> The only exception: if you run it twice on the **exact same source image**, crop files
> are overwritten (same content, so this is harmless).
---
### Step 3 — Split the dataset
Splits `data/` into `train/`, `val/`, and `test/` using a **stratified** strategy — every class gets the same ratio across all splits, so rare classes are not accidentally lost.
```bash
python 1b_split_dataset.py \
--data_dir data \
--output_dir crops_dataset \
--val_split 0.15 \
--test_split 0.05
```
| Argument | Default | Description |
|---|---|---|
| `--data_dir` | required | Labelled data root (subfolders = classes) |
| `--output_dir` | `crops_dataset` | Where to write train/val/test |
| `--val_split` | `0.15` | Fraction for validation |
| `--test_split` | `0.05` | Fraction for test (`0` to skip) |
| `--move` | off | Move files instead of copying (saves disk space) |
| `--min_per_class` | `2` | Warn if a class has fewer images than this after splitting |
**Automatically skipped folders:**
- `unknown/`, `train/`, `val/`, `test/`
- Any folder whose name starts with `_` (e.g. `_rejected_`, `_unreviewed_`, `_ignore_`)
The splitter prints a table so you can spot imbalanced or thin classes before training:
```
────────────────────────────────────────────────────────
Class Train Val Test
────────────────────────────────────────────────────────
cola_can 72 13 5
pepsi_can 58 10 4
lays_chips 12 2 ⚠ val<5
────────────────────────────────────────────────────────
TOTAL 142 25 9
```
> **Recommended minimums:** ≥ 50 training images and ≥ 10 val images per class.
> Classes below these thresholds should get more data before training.
---
### Step 3b — Balance & augment the dataset
> Optional but strongly recommended when classes have unequal image counts or any class has fewer than 50 training images.
Analyses the `train/` split, calculates how many images each class needs to reach a target count, then generates augmented copies using a three-tier albumentations pipeline until every class is balanced.
```bash
python balance_and_augment.py --data_dir crops_dataset --split train --max_scale 2.0 --workers 8 --dry_run
```
Remove `--dry_run` once you are happy with the plan.
| Argument | Default | Description |
|---|---|---|
| `--data_dir` | `crops_dataset` | Root with `train/` `val/` `test/` subfolders |
| `--split` | `train` | Which split to augment |
| `--target_count` | auto | Explicit target per class — omit to use auto |
| `--max_scale` | `2.0` | Auto target = largest class × this factor |
| `--min_count` | `0.95` | Skip classes already within 5 % of target |
| `--workers` | cpu − 1 | Parallel workers |
| `--dry_run` | off | Print the plan without writing files |
| `--val_split` | `0.0` | Fraction of augmented images also copied to `val/` |
| `--suffix` | `_aug` | Filename suffix added to augmented images |
| `--quality` | `92` | JPEG save quality |
**Dry-run output example:**
```
──────────────────────────────────────────────────────────
Class Current Target To add Status
──────────────────────────────────────────────────────────
cola_can 72 200 128 + 128 ████████████
lays_chips 18 200 182 + 182 ██
pepsi_can 58 200 142 + 142 ██████
siglo 204 200 0 ✓ ok ████████████████████
──────────────────────────────────────────────────────────
TOTAL 352 452
──────────────────────────────────────────────────────────
```
**Three-tier augmentation pipeline:**
| Tier | Transforms | Probability |
|---|---|---|
| **Light** (always) | HorizontalFlip, ShiftScaleRotate ±15°, BrightnessContrast ±30%, HueSaturation | 75–85% each |
| **Medium** (random subset) | Perspective, GridDistortion, ElasticTransform, Blur/Sharpen, GaussNoise, CoarseDropout (occlusion), JPEG compression | 25–40% |
| **Heavy** (rare) | RandomShadow, RandomSunFlare, RandomFog, ChannelShuffle, RGBShift | 8–15% |
Augmented files are written **beside the originals** in the same class folder. Originals are never modified or deleted.
> **When to use `--val_split`:** Pass `--val_split 0.10` to also copy 10% of the augmented images into `val/` if your val set is very small (< 5 images per class). For most cases, leave it at `0` — val should represent real unaugmented images.
---
### Step 3b — recommended workflow
```bash
# 1. Preview the plan
python balance_and_augment.py --data_dir crops_dataset --dry_run
# 2. Run with auto target (largest class × 2)
python balance_and_augment.py --data_dir crops_dataset --workers 8
# 3. Or set an explicit target
python balance_and_augment.py --data_dir crops_dataset --target_count 300
```
---
### Step 4 — Train the classifier
Trains an **EfficientNet-B0** (ImageNet pre-trained) on `crops_dataset/`. A `WeightedRandomSampler` is used automatically so class imbalance does not bias training.
```bash
python 2_train_classifier.py \
--data_dir crops_dataset \
--model efficientnet_b0 \
--epochs 50 \
--batch_size 64 \
--amp
```
| Argument | Default | Description |
|---|---|---|
| `--data_dir` | required | Root with `train/` and `val/` |
| `--output_dir` | `runs/classify` | Where checkpoints are saved |
| `--model` | `efficientnet_b0` | `efficientnet_b0`, `efficientnet_b2`, `mobilenet_v3_small`, `resnet50` |
| `--epochs` | `50` | Max training epochs |
| `--batch_size` | `64` | Batch size |
| `--img_size` | `224` | Input resolution |
| `--lr` | `1e-3` | Learning rate |
| `--patience` | `10` | Early stopping patience |
| `--amp` | off | Enable Automatic Mixed Precision (GPU only) |
| `--freeze_backbone` | off | Only train the head — recommended when you have fewer than ~50 images per class |
**Outputs saved to `runs/classify/`:**
| File | Description |
|---|---|
| `best.pt` | Best checkpoint by val accuracy |
| `last.pt` | Last epoch checkpoint |
| `class_names.json` | `{index: class_name}` used by inference and API |
| `training_curves.png` | Loss & accuracy plot |
#### Option B — Kaggle notebook (recommended for free GPU access)
`train_classifier_kaggle.ipynb` is a self-contained notebook version of the training script, designed to run on Kaggle's free T4 GPU with no local hardware required.
**Setup steps:**
1. Zip your `crops_dataset/` folder and upload it as a Kaggle Dataset:
- Go to [kaggle.com/datasets](https://www.kaggle.com/datasets) → **New Dataset**
- Upload the zip, give it a name (e.g. `my-product-crops`)
- Wait for processing to complete
*Note: Don't need to create New Dataset you just need to update it from [here](https://www.kaggle.com/datasets/triztechdata/product-dataset)*
2. Create a new Kaggle Notebook:
- Go to [kaggle.com/code](https://www.kaggle.com/code) → **New Notebook**
- Upload `train_classifier_kaggle.ipynb` via **File → Import Notebook**
3. Attach your dataset:
- In the right panel click **+ Add Data**
- Search for your dataset name and attach it
- It will appear at `/kaggle/input/my-product-crops/`
4. Enable the GPU:
- Right panel → **Session options → Accelerator → GPU T4 x2**
5. Edit **Cell 2 — Configuration** only:
```python
DATA_DIR = Path("/kaggle/input/my-product-crops") # ← your dataset path
MODEL_NAME = "efficientnet_b0"
EPOCHS = 50
BATCH_SIZE = 64
```
6. **Run All** (`Shift+Enter` through all cells, or **Run All** from the menu)
**What the notebook does beyond the plain script:**
| Cell | Extra feature |
|---|---|
| Cell 2b | Dataset diagnostics — prints per-class counts, flags classes with < 20 images, prints random-chance loss baseline |
| Cell 4 | Class distribution bar chart |
| Cell 5 | Augmented sample grid so you can visually verify your data loaded correctly |
| Cell 9 | Live training curves that update every epoch via `clear_output` |
| Cell 11 | Per-class validation accuracy with colour-coded bar chart (red < 50%, orange < 80%, green ≥ 80%) |
| Cell 12 | Normalised confusion matrix for the full val set |
| Cell 13 | Lists all output files with sizes |
**Downloading outputs:**
After training, download from `/kaggle/working/runs/classify/`:
- `best.pt` — copy to `runs/classify/best.pt` locally
- `class_names.json` — copy alongside `best.pt`
These two files are all you need to run `3_inference.py` and `api_server.py`.
#### Option C — Fully automated via `kaggle_train.py`
Run the entire Kaggle pipeline — upload, train, download — from a single command with no browser needed:
```bash
python kaggle_train.py \
--dataset_dir crops_dataset \
--notebook train_classifier_kaggle.ipynb \
--dataset_name my-product-crops \
--kernel_name product-classifier-train \
--output_dir runs/classify
```
**One-time setup (pick one option):**
**Option A — New token file** *(what Kaggle now issues — recommended)*
Go to [kaggle.com/settings/api](https://www.kaggle.com/settings/api) → **Create New Token**.
Kaggle shows you a command to run — paste it directly into your terminal:
```bash
mkdir -p ~/.kaggle && echo YOUR_TOKEN > ~/.kaggle/access_token && chmod 600 ~/.kaggle/access_token
```
**Option B — Environment variable**
```bash
export KAGGLE_API_TOKEN=your_token
```
**Option C — Legacy `kaggle.json`** *(still supported)*
Go to Settings → API → **Create Legacy API Key** → save the file:
```bash
mv ~/Downloads/kaggle.json ~/.kaggle/kaggle.json
chmod 600 ~/.kaggle/kaggle.json # Linux/Mac only
```
The script auto-detects which credential you have — no configuration needed.
**What the script does automatically:**
| Step | Action |
|---|---|
| 1 | Zips `crops_dataset/` and uploads (or updates) it as a Kaggle Dataset |
| 2 | Patches `DATA_DIR` in the notebook to match the uploaded dataset path |
| 3 | Pushes the notebook as a Kaggle Kernel and triggers a GPU run |
| 4 | Polls kernel status every 30 s until `complete` or `failed` |
| 5 | Downloads `best.pt`, `class_names.json`, and plot PNGs into `runs/classify/` |
**Arguments:**
| Argument | Default | Description |
|---|---|---|
| `--dataset_dir` | `crops_dataset` | Local dataset folder to upload |
| `--notebook` | `train_classifier_kaggle.ipynb` | Notebook file to push |
| `--dataset_name` | `product-crops` | Kaggle dataset slug (lowercase, hyphens) |
| `--kernel_name` | `product-classifier` | Kaggle kernel slug |
| `--output_dir` | `runs/classify` | Where to save downloaded weights |
| `--poll_interval` | `30` | Seconds between status checks |
| `--timeout` | `180` | Max minutes to wait before giving up |
| `--skip_upload` | off | Skip zip+upload — reuse existing Kaggle dataset |
| `--skip_push` | off | Skip kernel push — just poll and download last run |
| `--no_gpu` | off | Run on CPU instead of T4 GPU |
| `--public` | off | Make dataset and kernel public |
**Useful combinations:**
```bash
# Re-run training on an already uploaded dataset (faster — skips the zip/upload)
python kaggle_train.py --skip_upload --dataset_name my-product-crops --kernel_name product-classifier-train
# Just download the outputs of the last completed run (no upload, no push)
python kaggle_train.py --skip_upload --skip_push --kernel_name product-classifier-train
# Full run but with a fresh public kernel
python kaggle_train.py --dataset_name my-product-crops --kernel_name product-classifier-train --public
```
---
#### Diagnosing a stuck val loss
A val loss stuck above `ln(num_classes)` (e.g. > 3.13 for 23 classes) means the model is guessing randomly or confidently wrong. Common causes:
| Symptom | Fix |
|---|---|
| Too few images per class (< 20) | Collect more data via `auto_label.py` on new images |
| Large imbalance between classes | `WeightedRandomSampler` is already enabled — check the imbalance report printed at startup |
| `_ignore_` class in dataset | **Remove it.** Use `--cls_conf` threshold for rejection instead |
| Val loss high but train loss low | Classic overfitting — add `--freeze_backbone` or collect more data |
> **Do not use an `_ignore_` class.** Throwing unrelated products into one folder
> creates an incoherent class that harms the entire model. Use `--cls_conf` to
> reject low-confidence predictions at inference time instead.
---
### Step 5 — Run inference
Runs the full detect → classify pipeline on images, folders, videos, or webcam. Draws annotated bounding boxes and saves results.
```bash
python 3_inference.py \
--detector_weights detector/best.pt \
--classifier_weights runs/classify/best.pt \
--source shelf_images/ \
--det_conf 0.30 \
--cls_conf 0.65 \
--output_dir inference_results \
--show
```
| Argument | Default | Description |
|---|---|---|
| `--source` | required | Image, folder, video, or webcam index (`0`) |
| `--detector_weights` | required | YOLOv8n `.pt` |
| `--classifier_weights` | required | Classifier `best.pt` |
| `--det_conf` | `0.30` | Detection threshold |
| `--cls_conf` | `0.50` | Min classifier confidence to draw a label |
| `--det_iou` | `0.45` | NMS IoU threshold |
| `--padding` | `8` | Extra pixels added around each crop before classification |
| `--output_dir` | `inference_results` | Where annotated images/video are saved |
| `--show` | off | Display live with `cv2.imshow` |
| `--save_crops` | off | Also save individual crop images |
| `--no_save` | off | Skip saving annotated output |
#### Dynamic batch sizing
The classifier automatically probes available VRAM at startup and picks the largest safe batch size (with a 20% headroom margin). If an OOM occurs at runtime (e.g. an unusually dense frame with 260+ products), the batch is halved automatically and persisted for future frames. No manual tuning needed.
---
## 5. API Server
A REST API with a polling pattern for integration into other applications.
```bash
pip install fastapi uvicorn
uvicorn api_server:app --host 0.0.0.0 --port 8000 --workers 1
```
Configuration via environment variables:
```bash
DETECTOR_WEIGHTS=detector/best.pt
CLASSIFIER_WEIGHTS=runs/classify/best.pt
DET_CONF=0.25
CLS_CONF=0.50
```
### Endpoints
#### `POST /jobs` — Submit a job
```json
{
"image": "",
"interested_classes": ["cola_can", "pepsi_can"],
"cls_conf": 0.65
}
```
`interested_classes` filters the results to only those classes. Send an empty list `[]` to return all detected products.
Returns immediately:
```json
{ "job_id": "550e8400-e29b-41d4-a716-446655440000" }
```
#### `GET /jobs/{job_id}` — Poll for results
Call every ~3 seconds until `status` is `"done"` or `"failed"`.
```json
{
"status": "processing",
"progress": 50,
"results": null
}
```
When done:
```json
{
"status": "done",
"progress": 100,
"results": {
"annotated_image": "",
"counts": {
"cola_can": 3,
"pepsi_can": 1
},
"detections": [
{ "class": "cola_can", "confidence": 0.91, "bbox": [120, 45, 210, 180] },
{ "class": "cola_can", "confidence": 0.87, "bbox": [230, 48, 318, 182] },
{ "class": "pepsi_can", "confidence": 0.79, "bbox": [340, 51, 428, 185] }
]
}
}
```
Progress stages:
| Progress | Stage |
|---|---|
| 5 | Image decoded |
| 10 | Detection started |
| 30 | Detection done |
| 50 | Crops extracted |
| 75 | Classification done |
| 90 | Image annotated |
| 100 | Done |
#### `GET /health` — Server health check
```json
{
"status": "ok",
"device": "cuda",
"classes": ["cola_can", "pepsi_can", "..."],
"active_jobs": 2
}
```
#### `GET /classes` — List available classes
```json
{ "classes": ["cola_can", "pepsi_can", "lays_chips", "..."] }
```
---
## 6. Script Reference
| Script | Purpose | Inputs | Outputs |
|---|---|---|---|
| `1_generate_crop_dataset.py` | Detect & crop (no classifier) | shelf images | `data/unknown/*.jpg` |
| `auto_label.py` | Detect + auto-classify + browser review | shelf images + both models | `data//*.jpg` |
| `1b_split_dataset.py` | Stratified train/val/test split | `data/` | `crops_dataset/` |
| `balance_and_augment.py` | Balance classes + augment | `crops_dataset/train/` | augmented images in-place |
| `kaggle_train.py` | Automate Kaggle upload + train + download | `crops_dataset/` + notebook | `runs/classify/best.pt` |
| `2_train_classifier.py` | Train EfficientNet classifier | `crops_dataset/` | `runs/classify/best.pt` |
| `3_inference.py` | End-to-end detect + classify | images / video / webcam | annotated images/video |
| `api_server.py` | REST polling API | — | JSON + base64 annotated image |
| `train_classifier_kaggle.ipynb` | Kaggle training notebook | Kaggle dataset | `best.pt` + plots |
---
## 7. Troubleshooting
**`FileNotFoundError: No images found in: 01.jpg`**
You passed a file path that does not exist relative to your working directory. Use the full path or `cd` into the correct folder first.
**`OverflowError: Python integer 276 out of bounds for uint8`**
This was a known bug (HSV hue > 179) — already fixed in the current `3_inference.py`.
**Val loss stuck at ~5 during training**
See [Diagnosing a stuck val loss](#diagnosing-a-stuck-val-loss) above.
**`CUDA out of memory` during inference**
The dynamic batch sizer handles this automatically by halving the batch and retrying. If it keeps happening, your crops may be very large — reduce `--padding` or `--img_size`.
**`CUDA out of memory` during training**
Reduce `--batch_size`. Start at 32 and halve until it fits.
**Browser does not open automatically after `auto_label.py`**
Open `http://localhost:5000` manually.
**Classifier only predicts one class**
Almost always class imbalance. Check the imbalance report printed during `build_loaders`. The `WeightedRandomSampler` should compensate, but if one class has 10× more images, collect more data for the minority classes.
---
## 8. Tips & Best Practices
**Data collection**
- Aim for **≥ 50 training images per class** before expecting good results.
- Vary lighting, angles, partial occlusion, and zoom levels in your source images.
- Run `auto_label.py` on new batches of images regularly — the dataset grows incrementally and the model improves each iteration.
**Labelling**
- Use the **confidence slider** in the review UI to start reviewing high-confidence crops first (`> 0.8`) — these are almost always correct and can be bulk-confirmed quickly.
- Filter the sidebar to one class at a time and use **Confirm all visible** — scanning one class at a time is much faster than random-order review.
- Never put unrecognised products into a catch-all class. Leave them in `_unreviewed_/` or reject them. Use `--cls_conf` to suppress uncertain predictions at inference time.
**Training**
- Start with `--freeze_backbone` if you have fewer than 50 images per class. Once you have more data, retrain without it.
- Use the Kaggle notebook for free T4 GPU access — it includes a diagnostic cell that checks class counts and imbalance before training starts.
- `efficientnet_b0` is the best default — fast, accurate, small. Only upgrade to `efficientnet_b2` if B0 accuracy plateaus and you have plenty of data.
**Iterative improvement loop**
```
Shoot new shelf photos
↓
auto_label.py (detect + auto-classify)
↓
Review UI (confirm / fix / reject)
↓
1b_split_dataset.py (re-split the grown dataset)
↓
balance_and_augment.py (equalise class counts, generate augmented copies)
↓
2_train_classifier.py (local) OR kaggle_train.py (automated Kaggle)
↓
3_inference.py / api_server.py (deploy updated model)
↓
repeat
```
Each iteration your classifier gets better, which means the auto-labelling in the next iteration needs less manual correction.
---

Per-Class Accuracy
|

Class Distribution
|

Confusion Matrix
|

Training Curves
|