| assets | ||
| data | ||
| detector | ||
| inference_results | ||
| runs/classify | ||
| shelf_test | ||
| we_need_more_data_for_these | ||
| .gitignore | ||
| 1_generate_crop_dataset.py | ||
| 1b_split_dataset.py | ||
| 2_product-classifier.ipynb | ||
| 2_train_classifier.py | ||
| 3_inference.py | ||
| api_server.py | ||
| auto_label.py | ||
| balance_and_augment.py | ||
| best.pt | ||
| class_labeller.py | ||
| class_names.json | ||
| environment.yml | ||
| pipeline_diagram.html | ||
| README.md | ||

Product Detection & Classification Pipeline
A two-stage computer vision pipeline that combines a fine-tuned YOLOv8n detector with a EfficientNet classifier to detect and identify products on retail shelves.
Shelf image → YOLOv8n (detect) → EfficientNet (classify) → labelled bounding boxes
Table of Contents
- Project Structure
- Installation
- Pipeline Overview
- Step-by-step Guide
- API Server
- Script Reference
- Troubleshooting
- Tips & Best Practices
1. Project Structure
project/
│
├── detector/
│   └── best.pt                  ← your fine-tuned YOLOv8n weights
│
├── runs/classify/
│   ├── best.pt                  ← trained classifier weights (output of step 4)
│   ├── last.pt
│   ├── class_names.json         ← {index: class_name} mapping
│   ├── training_curves.png
│   ├── per_class_accuracy.png
│   └── confusion_matrix.png
│
├── data/                        ← labelled crops (built incrementally)
│   ├── cola_can/
│   ├── pepsi_can/
│   ├── _rejected_/              ← crops you rejected during review
│   └── _unreviewed_/            ← crops you skipped during review
│
├── crops_dataset/               ← final train/val/test split (input to training)
│   ├── train/
│   ├── val/
│   └── test/
│
├── 1_generate_crop_dataset.py   ← detect & crop (no classifier needed)
├── auto_label.py                ← detect + auto-classify + browser review UI
├── 1b_split_dataset.py          ← stratified train/val/test splitter
├── 2_train_classifier.py        ← train EfficientNet classifier
├── 3_inference.py               ← end-to-end detect + classify on new images
├── api_server.py                ← FastAPI polling server
└── train_classifier_kaggle.ipynb
2. Installation
The project uses a Conda environment for reproducible dependency management.
Create the environment
conda env create -f environment.yml
conda activate product-detection
environment.yml
name: product-detection
channels:
  - conda-forge
dependencies:
  - python=3.10
  - numpy<2
  - pip
  - pip:
      - torch
      - torchvision
      - opencv-python
      - ultralytics
      - pillow==10.0.0
      - tqdm
      - pyyaml
      - simsimd
      - albumentations
      - faiss-cpu
      - fastapi
      - uvicorn[standard]
      - flask
GPU users
torch and torchvision are installed as CPU builds by default via pip inside conda. To use a GPU, replace the torch and torchvision lines in the yml with the CUDA-enabled builds before creating the environment:
    - torch==2.3.0+cu121
    - torchvision==0.18.0+cu121
    --extra-index-url https://download.pytorch.org/whl/cu121
Or install them manually after environment creation:
conda activate product-detection
pip install torch torchvision --index-url https://download.pytorch.org/whl/cu121
Update an existing environment
If environment.yml changes, sync the existing environment without recreating it:
conda env update -f environment.yml --prune
3. Pipeline Overview
There are two ways to build your dataset depending on whether you already have a trained classifier:
┌─────────────────────────────────────────────────────────────────┐
│  PATH A — First time (no classifier yet)                        │
│                                                                 │
│  1_generate_crop_dataset.py  →  label manually  →              │
│  1b_split_dataset.py  →  2_train_classifier.py                  │
└─────────────────────────────────────────────────────────────────┘

┌─────────────────────────────────────────────────────────────────┐
│  PATH B — You already have a classifier (recommended after v1)  │
│                                                                 │
│  auto_label.py  →  review in browser  →                        │
│  1b_split_dataset.py  →  2_train_classifier.py                  │
└─────────────────────────────────────────────────────────────────┘
Once you have a working classifier, always use Path B. It is faster, more accurate, and requires far less manual labelling work.
4. Step-by-step Guide
Step 1 — Generate crops
Use this step if you are starting from scratch with no classifier yet. If you already have
runs/classify/best.pt, skip to Step 2.
Runs YOLOv8n on your shelf images and saves every detection as a cropped JPEG into data/unknown/. No classification happens here — you label manually afterwards.
python 1_generate_crop_dataset.py \
    --source     shelf_images/ \
    --weights    detector/best.pt \
    --output_dir data \
    --conf       0.25 \
    --padding    10 \
    --min_size   32
| Argument | Default | Description |
|---|---|---|
--source |
required | Image file, folder, or glob pattern |
--weights |
required | YOLOv8n .pt file |
--output_dir |
data |
Root folder — crops go into <output_dir>/unknown/ |
--conf |
0.25 |
Detection confidence threshold |
--iou |
0.45 |
NMS IoU threshold |
--padding |
10 |
Extra pixels added around each crop |
--min_size |
32 |
Discard crops smaller than this (px) |
--save_labels |
off | Save a .txt sidecar with YOLO class info |
After this step, move crops from data/unknown/ into named class folders:
data/
    unknown/          ← before
    cola_can/         ← after (you create these)
    pepsi_can/
    lays_chips/
Use any file manager, or a tool like Label Studio for faster annotation.
Step 2 — Auto-label & Review
Use this step once you have a trained classifier. It replaces manual labelling almost entirely.
Runs the full detect → crop → classify pipeline in one command, then opens a browser UI where you review, confirm, fix, or reject each prediction.
python auto_label.py \
    --source             shelf_images/ \
    --detector_weights   detector/best.pt \
    --classifier_weights runs/classify/best.pt \
    --output_dir         data \
    --cls_conf           0.50
| Argument | Default | Description |
|---|---|---|
--source |
required | Image file, folder, or glob |
--detector_weights |
required | YOLOv8n .pt |
--classifier_weights |
required | Classifier best.pt |
--output_dir |
data |
Where confirmed crops are written |
--det_conf |
0.25 |
Detection threshold |
--cls_conf |
0.50 |
Min classifier confidence to auto-label |
--port |
5000 |
Browser UI port |
The browser opens automatically at http://localhost:5000.
Review UI controls
| Action | How |
|---|---|
| Open crop detail | Click a card |
| Confirm prediction | C key or Confirm button |
| Reject crop | R key or Reject button |
| Override the class | Pick from dropdown → Apply override |
| Navigate crops | ← → arrow keys |
| Close modal | Esc |
| Multi-select | Ctrl+click or Shift+click |
| Bulk confirm/reject/reclassify | Select multiple → use bulk bar |
| Confirm all visible | ✓ Confirm all visible button |
| Filter by class | Click a class in the left sidebar |
| Filter by status | Toggle buttons in toolbar |
| Filter by confidence | Drag the min-conf slider |
Status meanings
| Status | Meaning |
|---|---|
auto |
Classifier's prediction, not yet reviewed |
confirmed |
You agreed with the prediction |
reclassified |
You changed it to a different class |
rejected |
Not a useful crop (bad detection, not a product of interest) |
Committing
Click Commit dataset → to write all crops to data/:
data/
    cola_can/       ← confirmed + reclassified
    pepsi_can/
    _rejected_/     ← rejected crops (kept for reference)
    _unreviewed_/   ← anything still "auto" when you committed
Important: Commit is always additive. It never deletes existing files in
data/. Runningauto_label.pyon new shelf images simply grows the dataset. The only exception: if you run it twice on the exact same source image, crop files are overwritten (same content, so this is harmless).
Step 3 — Split the dataset
Splits data/ into train/, val/, and test/ using a stratified strategy — every class gets the same ratio across all splits, so rare classes are not accidentally lost.
python 1b_split_dataset.py \
    --data_dir   data \
    --output_dir crops_dataset \
    --val_split  0.15 \
    --test_split 0.05
| Argument | Default | Description |
|---|---|---|
--data_dir |
required | Labelled data root (subfolders = classes) |
--output_dir |
crops_dataset |
Where to write train/val/test |
--val_split |
0.15 |
Fraction for validation |
--test_split |
0.05 |
Fraction for test (0 to skip) |
--move |
off | Move files instead of copying (saves disk space) |
--min_per_class |
2 |
Warn if a class has fewer images than this after splitting |
Automatically skipped folders:
unknown/,train/,val/,test/- Any folder whose name starts with
_(e.g._rejected_,_unreviewed_,_ignore_)
The splitter prints a table so you can spot imbalanced or thin classes before training:
────────────────────────────────────────────────────────
  Class                          Train     Val    Test
────────────────────────────────────────────────────────
  cola_can                          72      13       5
  pepsi_can                         58      10       4
  lays_chips                        12       2  ⚠ val<5
────────────────────────────────────────────────────────
  TOTAL                            142      25       9
Recommended minimums: ≥ 50 training images and ≥ 10 val images per class. Classes below these thresholds should get more data before training.
Step 4 — Train the classifier
Trains an EfficientNet-B0 (ImageNet pre-trained) on crops_dataset/. A WeightedRandomSampler is used automatically so class imbalance does not bias training.
python 2_train_classifier.py \
    --data_dir  crops_dataset \
    --model     efficientnet_b0 \
    --epochs    50 \
    --batch_size 64 \
    --amp
| Argument | Default | Description |
|---|---|---|
--data_dir |
required | Root with train/ and val/ |
--output_dir |
runs/classify |
Where checkpoints are saved |
--model |
efficientnet_b0 |
efficientnet_b0, efficientnet_b2, mobilenet_v3_small, resnet50 |
--epochs |
50 |
Max training epochs |
--batch_size |
64 |
Batch size |
--img_size |
224 |
Input resolution |
--lr |
1e-3 |
Learning rate |
--patience |
10 |
Early stopping patience |
--amp |
off | Enable Automatic Mixed Precision (GPU only) |
--freeze_backbone |
off | Only train the head — recommended when you have fewer than ~50 images per class |
Outputs saved to runs/classify/:
| File | Description |
|---|---|
best.pt |
Best checkpoint by val accuracy |
last.pt |
Last epoch checkpoint |
class_names.json |
{index: class_name} used by inference and API |
training_curves.png |
Loss & accuracy plot |
Option B — Kaggle notebook (recommended for free GPU access)
train_classifier_kaggle.ipynb is a self-contained notebook version of the training script, designed to run on Kaggle's free T4 GPU with no local hardware required.
Setup steps:
-
Zip your
crops_dataset/folder and upload it as a Kaggle Dataset:- Go to kaggle.com/datasets → New Dataset
- Upload the zip, give it a name (e.g.
my-product-crops) - Wait for processing to complete
-
Create a new Kaggle Notebook:
- Go to kaggle.com/code → New Notebook
- Upload
train_classifier_kaggle.ipynbvia File → Import Notebook
-
Attach your dataset:
- In the right panel click + Add Data
- Search for your dataset name and attach it
- It will appear at
/kaggle/input/my-product-crops/
-
Enable the GPU:
- Right panel → Session options → Accelerator → GPU T4 x1
-
Edit Cell 2 — Configuration only:
DATA_DIR = Path("/kaggle/input/my-product-crops") # ← your dataset path MODEL_NAME = "efficientnet_b0" EPOCHS = 50 BATCH_SIZE = 64 -
Run All (
Shift+Enterthrough all cells, or Run All from the menu)
What the notebook does beyond the plain script:
| Cell | Extra feature |
|---|---|
| Cell 2b | Dataset diagnostics — prints per-class counts, flags classes with < 20 images, prints random-chance loss baseline |
| Cell 4 | Class distribution bar chart |
| Cell 5 | Augmented sample grid so you can visually verify your data loaded correctly |
| Cell 9 | Live training curves that update every epoch via clear_output |
| Cell 11 | Per-class validation accuracy with colour-coded bar chart (red < 50%, orange < 80%, green ≥ 80%) |
| Cell 12 | Normalised confusion matrix for the full val set |
| Cell 13 | Lists all output files with sizes |
Downloading outputs:
After training, download from /kaggle/working/runs/classify/:
best.pt— copy toruns/classify/best.ptlocallyclass_names.json— copy alongsidebest.pt
These two files are all you need to run 3_inference.py and api_server.py.
Diagnosing a stuck val loss
A val loss stuck above ln(num_classes) (e.g. > 3.13 for 23 classes) means the model is guessing randomly or confidently wrong. Common causes:
| Symptom | Fix |
|---|---|
| Too few images per class (< 20) | Collect more data via auto_label.py on new images |
| Large imbalance between classes | WeightedRandomSampler is already enabled — check the imbalance report printed at startup |
_ignore_ class in dataset |
Remove it. Use --cls_conf threshold for rejection instead |
| Val loss high but train loss low | Classic overfitting — add --freeze_backbone or collect more data |
Do not use an
_ignore_class. Throwing unrelated products into one folder creates an incoherent class that harms the entire model. Use--cls_confto reject low-confidence predictions at inference time instead.
Step 5 — Run inference
Runs the full detect → classify pipeline on images, folders, videos, or webcam. Draws annotated bounding boxes and saves results.
python 3_inference.py \
    --detector_weights   detector/best.pt \
    --classifier_weights runs/classify/best.pt \
    --source             shelf_images/ \
    --det_conf           0.30 \
    --cls_conf           0.65 \
    --output_dir         inference_results \
    --show
| Argument | Default | Description |
|---|---|---|
--source |
required | Image, folder, video, or webcam index (0) |
--detector_weights |
required | YOLOv8n .pt |
--classifier_weights |
required | Classifier best.pt |
--det_conf |
0.30 |
Detection threshold |
--cls_conf |
0.50 |
Min classifier confidence to draw a label |
--det_iou |
0.45 |
NMS IoU threshold |
--padding |
8 |
Extra pixels added around each crop before classification |
--output_dir |
inference_results |
Where annotated images/video are saved |
--show |
off | Display live with cv2.imshow |
--save_crops |
off | Also save individual crop images |
--no_save |
off | Skip saving annotated output |
Dynamic batch sizing
The classifier automatically probes available VRAM at startup and picks the largest safe batch size (with a 20% headroom margin). If an OOM occurs at runtime (e.g. an unusually dense frame with 260+ products), the batch is halved automatically and persisted for future frames. No manual tuning needed.
5. API Server
A REST API with a polling pattern for integration into other applications.
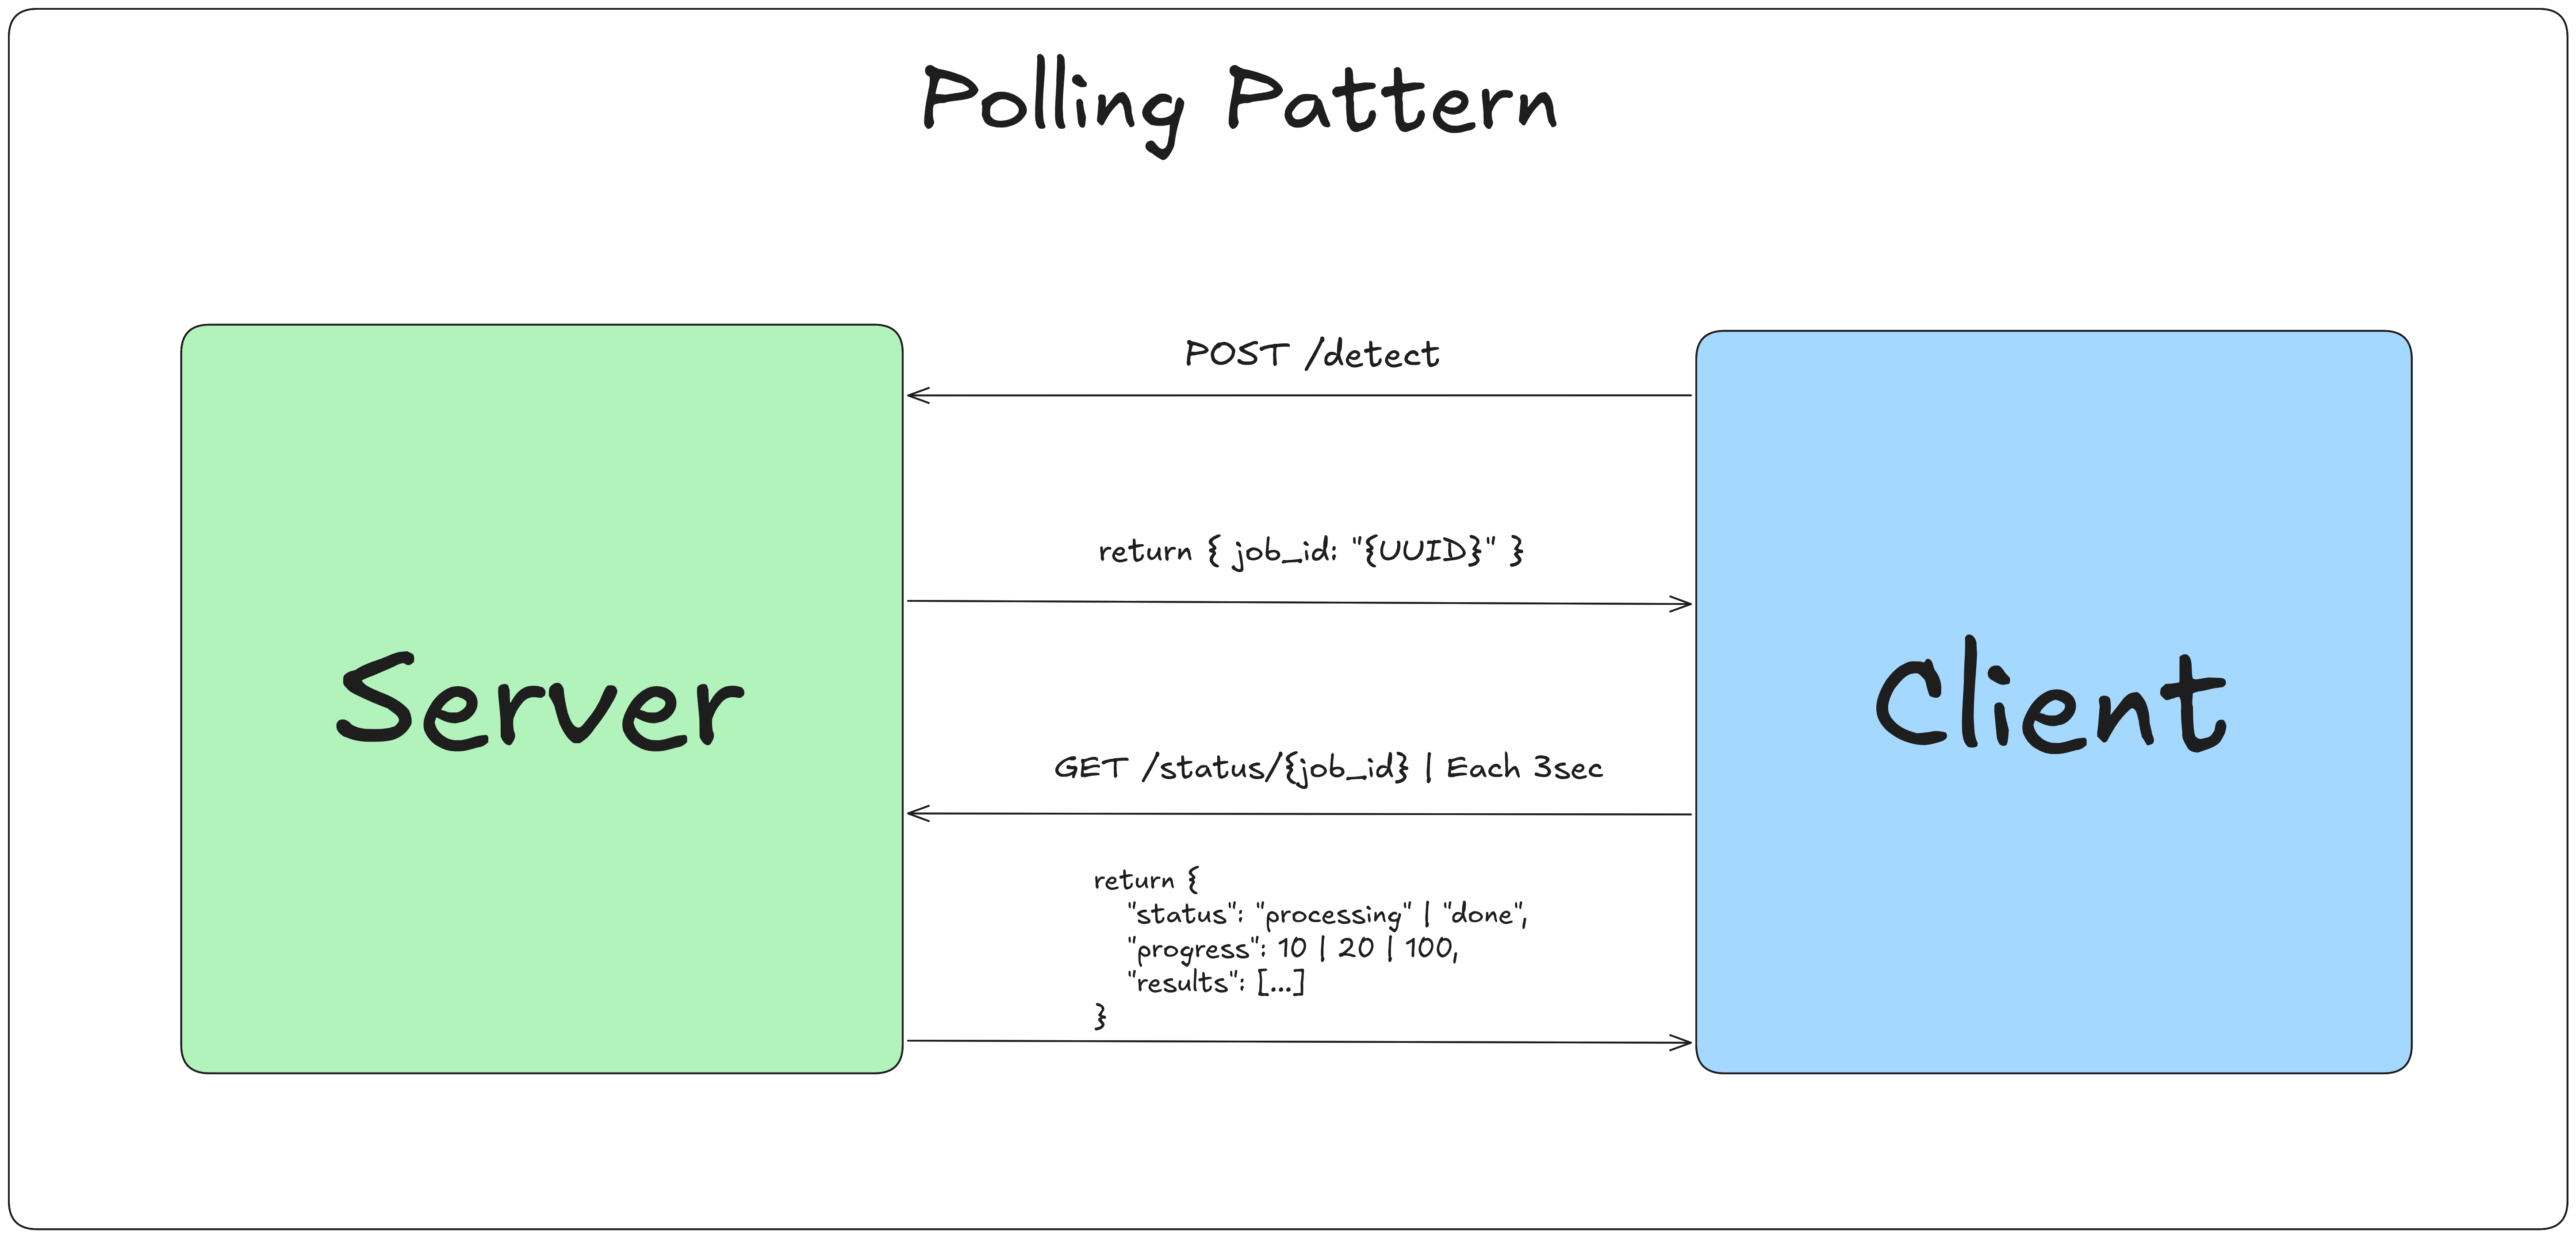
pip install fastapi uvicorn
uvicorn api_server:app --host 0.0.0.0 --port 8000 --workers 1
Configuration via environment variables:
DETECTOR_WEIGHTS=detector/best.pt
CLASSIFIER_WEIGHTS=runs/classify/best.pt
DET_CONF=0.25
CLS_CONF=0.50
Endpoints
POST /jobs — Submit a job
{
  "image": "<base64-encoded image>",
  "interested_classes": ["cola_can", "pepsi_can"],
  "cls_conf": 0.65
}
interested_classes filters the results to only those classes. Send an empty list [] to return all detected products.
Returns immediately:
{ "job_id": "550e8400-e29b-41d4-a716-446655440000" }
GET /jobs/{job_id} — Poll for results
Call every ~3 seconds until status is "done" or "failed".
{
  "status": "processing",
  "progress": 50,
  "results": null
}
When done:
{
  "status": "done",
  "progress": 100,
  "results": {
    "annotated_image": "<base64 JPEG>",
    "counts": {
      "cola_can": 3,
      "pepsi_can": 1
    },
    "detections": [
      { "class": "cola_can", "confidence": 0.91, "bbox": [120, 45, 210, 180] },
      { "class": "cola_can", "confidence": 0.87, "bbox": [230, 48, 318, 182] },
      { "class": "pepsi_can", "confidence": 0.79, "bbox": [340, 51, 428, 185] }
    ]
  }
}
Progress stages:
| Progress | Stage |
|---|---|
| 5 | Image decoded |
| 10 | Detection started |
| 30 | Detection done |
| 50 | Crops extracted |
| 75 | Classification done |
| 90 | Image annotated |
| 100 | Done |
GET /health — Server health check
{
  "status": "ok",
  "device": "cuda",
  "classes": ["cola_can", "pepsi_can", "..."],
  "active_jobs": 2
}
GET /classes — List available classes
{ "classes": ["cola_can", "pepsi_can", "lays_chips", "..."] }
6. Script Reference
| Script | Purpose | Inputs | Outputs |
|---|---|---|---|
1_generate_crop_dataset.py |
Detect & crop (no classifier) | shelf images | data/unknown/*.jpg |
auto_label.py |
Detect + auto-classify + browser review | shelf images + both models | data/<class>/*.jpg |
1b_split_dataset.py |
Stratified train/val/test split | data/ |
crops_dataset/ |
2_train_classifier.py |
Train EfficientNet classifier | crops_dataset/ |
runs/classify/best.pt |
3_inference.py |
End-to-end detect + classify | images / video / webcam | annotated images/video |
api_server.py |
REST polling API | — | JSON + base64 annotated image |
train_classifier_kaggle.ipynb |
Kaggle training notebook | Kaggle dataset | best.pt + plots |
7. Troubleshooting
FileNotFoundError: No images found in: 01.jpg
You passed a file path that does not exist relative to your working directory. Use the full path or cd into the correct folder first.
OverflowError: Python integer 276 out of bounds for uint8
This was a known bug (HSV hue > 179) — already fixed in the current 3_inference.py.
Val loss stuck at ~5 during training See Diagnosing a stuck val loss above.
CUDA out of memory during inference
The dynamic batch sizer handles this automatically by halving the batch and retrying. If it keeps happening, your crops may be very large — reduce --padding or --img_size.
CUDA out of memory during training
Reduce --batch_size. Start at 32 and halve until it fits.
Browser does not open automatically after auto_label.py
Open http://localhost:5000 manually.
Classifier only predicts one class
Almost always class imbalance. Check the imbalance report printed during build_loaders. The WeightedRandomSampler should compensate, but if one class has 10× more images, collect more data for the minority classes.
8. Tips & Best Practices
Data collection
- Aim for ≥ 50 training images per class before expecting good results.
- Vary lighting, angles, partial occlusion, and zoom levels in your source images.
- Run
auto_label.pyon new batches of images regularly — the dataset grows incrementally and the model improves each iteration.
Labelling
- Use the confidence slider in the review UI to start reviewing high-confidence crops first (
> 0.8) — these are almost always correct and can be bulk-confirmed quickly. - Filter the sidebar to one class at a time and use Confirm all visible — scanning one class at a time is much faster than random-order review.
- Never put unrecognised products into a catch-all class. Leave them in
_unreviewed_/or reject them. Use--cls_confto suppress uncertain predictions at inference time.
Training
- Start with
--freeze_backboneif you have fewer than 50 images per class. Once you have more data, retrain without it. - Use the Kaggle notebook for free T4 GPU access — it includes a diagnostic cell that checks class counts and imbalance before training starts.
efficientnet_b0is the best default — fast, accurate, small. Only upgrade toefficientnet_b2if B0 accuracy plateaus and you have plenty of data.
Iterative improvement loop
Shoot new shelf photos
       ↓
auto_label.py  (detect + auto-classify)
       ↓
Review UI  (confirm / fix / reject)
       ↓
1b_split_dataset.py  (re-split the grown dataset)
       ↓
2_train_classifier.py  (retrain from scratch or from last.pt)
       ↓
3_inference.py / api_server.py  (deploy updated model)
       ↓
     repeat
Each iteration your classifier gets better, which means the auto-labelling in the next iteration needs less manual correction.