
8.2 KiB
Getting Started
Setup
Fork & Clone
If you intend to contribute back changes, or if you would like to pull updates we make to the OHIF Viewer, then follow these steps:
- Fork the OHIF/Viewers repository
- Create a local clone of your fork
git clone https://github.com/YOUR-USERNAME/Viewers
- Add OHIF/Viewers as a remote repository labled
upstream- Navigate to the cloned project's directory
git remote add upstream https://github.com/OHIF/Viewers.git
With this setup, you can now sync your fork to keep it up-to-date with the upstream (original) repository. This is called a "Triangular Workflow" and is common for Open Source projects. The GitHub blog has a good graphic that illustrates this setup.
Private
Alternatively, if you intend to use the OHIF Viewer as a starting point, and you aren't as concerned with syncing updates, then follow these steps:
- Navigate to the OHIF/Viewers/tree/react repository and branch
- Click
Clone or download, and thenDownload ZIP - Use the contents of the
.zipfile as a starting point for your viewer
NOTE: It is still possible to sync changes using this approach. However, submitting pull requests for fixes and features are best done with the separate, forked repository setup described in "Fork & Clone"
Develop
Requirements
Kick the tires
Navigate to the root of the project's directory in your terminal and run the following commands:
# Restore dependencies
yarn install

# Start local development server
yarn start
You should see the following output:
Compiled successfully!

You can now view ohif-viewer in the browser.

  Local:            http://localhost:5000/
  On Your Network:  http://10.74.20.83:5000/

Note that the development build is not optimized.
To create a production build, use yarn build.
Configuring
Note: This will connect to our public DICOMWeb server so you can verify your installation. Follow the next section to connect to your own local or remote DICOMWeb server.
- Launch the OHIF Viewer Study List. By default the address is http://localhost:3000/. The port may vary so check the start up output messages such as:
If everything is working correctly, you should see the studies from our public archive when you visit the Study List.
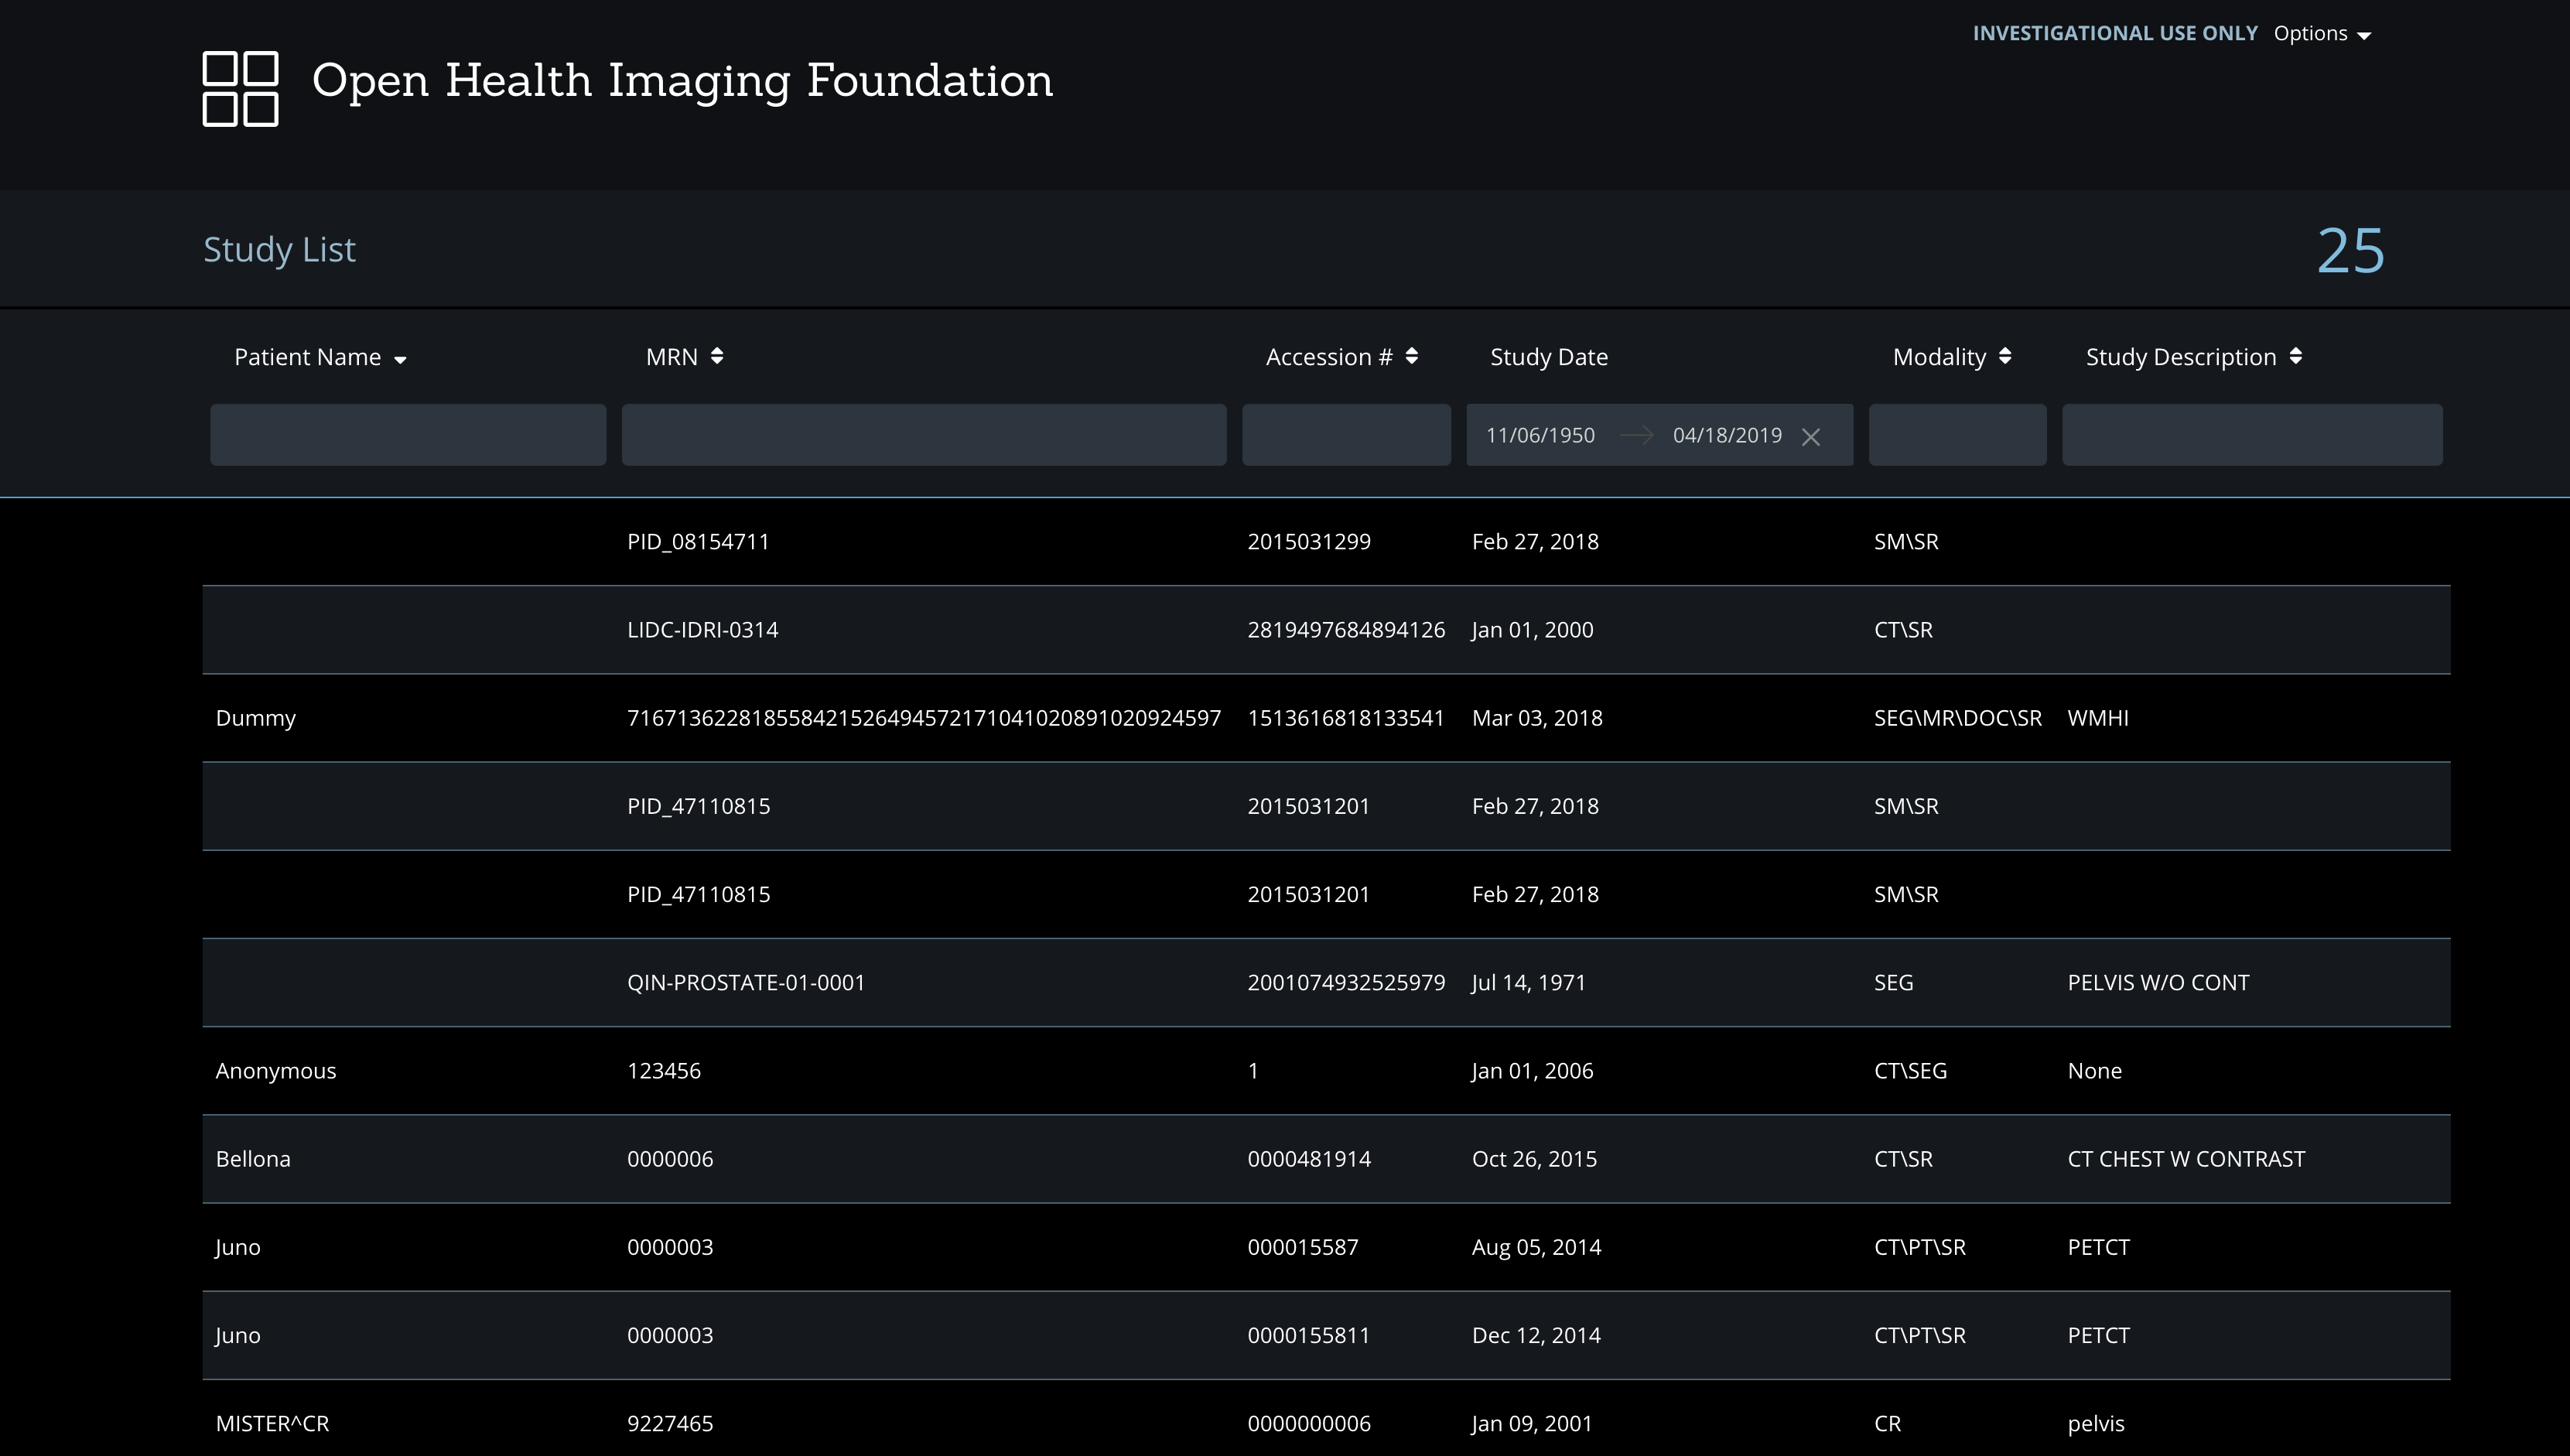
-
Double-click on a Study in the Study List to launch it in the Viewer
If everything is working correctly, you should see your study load into the Viewer.
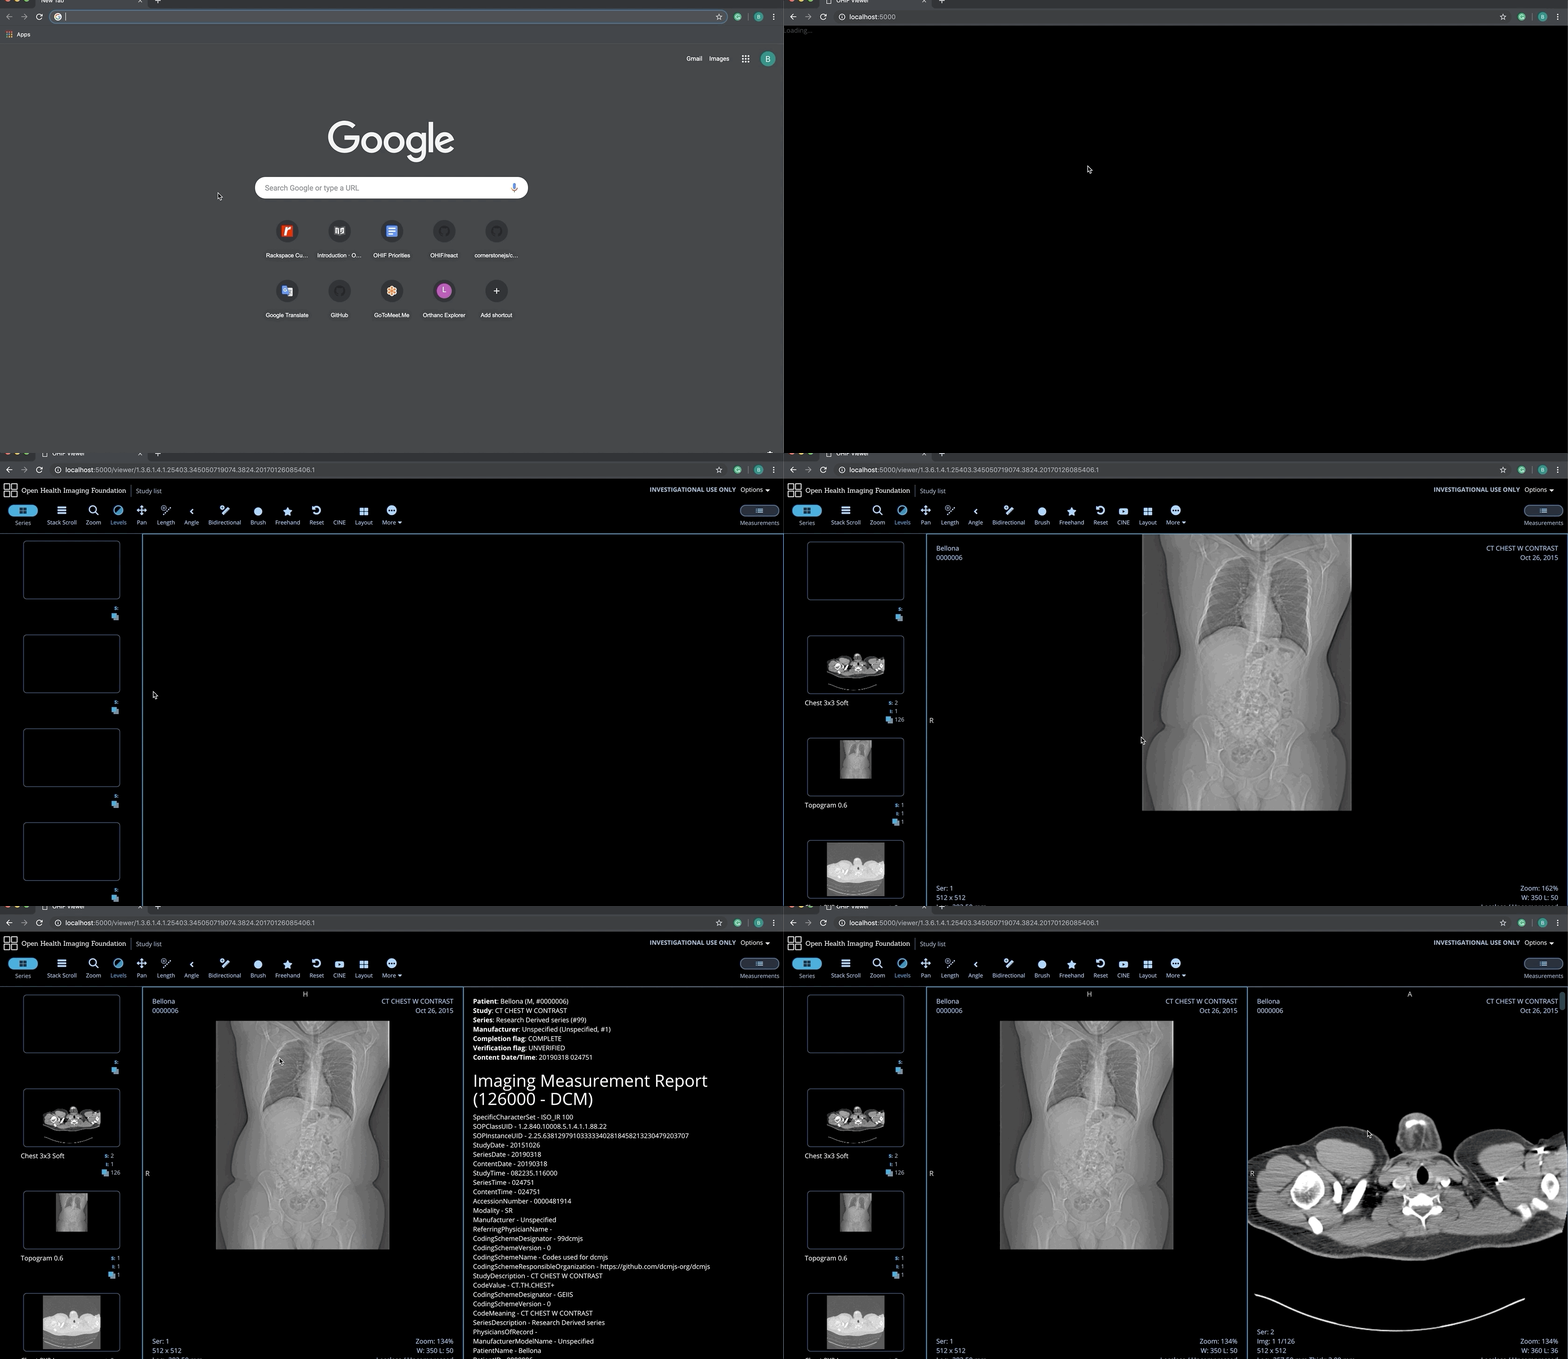
Set up a local DICOM server
- Choose and install an Image Archive
- Upload some data into your archive (e.g. with DCMTK's storescu or your archive's web interface)
- Keep the server running
Open Source DICOM Image Archive Options
| Archive | Installation |
|---|---|
| DCM4CHEE Archive 5.x | Installation with Docker |
| Orthanc | Installation with Docker |
| DICOMcloud (DICOM Web only) | Installation |
| OsiriX (Mac OSX only) | |
| Horos (Mac OSX only) |
Feel free to make a Pull Request if you want to add to this list.
Orthanc with Docker
Depending on whether or not you want uploaded studies to persist in Orthanc after Docker has been closed, there are two different methods for starting the Docker image:
Temporary data storage
This command will start an instance of the jodogne/orthanc-plugins Docker image. All data will be removed when the instance is stopped!
docker run --rm -p 4242:4242 -p 8042:8042 jodogne/orthanc-plugins
Persistent data storage
In order to allow your data to persist after the instance is stopped, you first need to create an image and attached data volume with Docker. The steps are as follows:
-
Create a persistent data volume for Orthanc to use
docker create --name sampledata -v /sampledata jodogne/orthanc-pluginsNote: On Windows, you need to use an absolute path for the data volume, like so:
docker create --name sampledata -v '//C/Users/erik/sampledata' jodogne/orthanc-plugins -
Run Orthanc from Docker with the data volume attached
docker run --volumes-from sampledata -p 4242:4242 -p 8042:8042 jodogne/orthanc-plugins -
Upload your data and it will be persisted
Setting up OHIF Viewer with Orthanc as an example
Once you have Orthanc running with docker either with temporary data storage or persistent data storage we con move forward with the next steps.
-
Load orthanc with a dataset you might want to use. To upload data use http://localhost:8042/app/explorer.html.
orthanc is the username and password for orthanc docker
-
Go under http://localhost:8042/app/explorer.html#upload and upload your DICOM files there
-
After you load the data, open a new terminal tab in the
ohif-viewerdirectory and install all dependency packages via Yarn
yarn install
- Run the application using one of the available configuration files. the
following command assumes you are under the
rootfolder
export REACT_APP_CONFIG=$(cat ./config/local_orthanc.js)
yarn start
This uses the Custom Environment Variables of Create-React-App to pass in your configuration. The example above will not work on Windows. Please visit the link to read about how to set environment variables on Windows.
-
Launch the OHIF Viewer Study List by visiting http://localhost:3000/ in a web browser.
If everything is working correctly, you should see the Study List from your archive when you visit the Study List.
-
Double-click on a Study in the Study List to launch it in the Viewer
If everything is working correctly, you should see your study load into the Viewer.
Troubleshooting
- If you receive a "No Studies Found" message and do not see your studies, try changing the Study Date filters to a wider range.
- If you see a 'Loading' message which never resolves, check your browser JavaScript console inside the Developer Tools to identify any errors.
- If you receive
exit code 137, increase the amount of memory available to your docker instances. - If you see any errors in your server console, check the Troubleshooting page for more in depth advice.